使用NVDEC加速视频解码¶
本教程介绍如何在 TorchAudio 中使用 Nvidia 的硬件视频解码(NVDEC)†。
NOTE
This tutorial is authored in Google Colab, and is tailored to Google Colab’s specifications.
Please check out this tutorial in Google Colab.
If you install FFmpeg following this tutorial, please adjust the build configuration accordingly.
要在 TorchAudio 中使用 NVDEC,需要以下项目。
配备硬件视频编码器的 Nvidia GPU。
使用 NVDEC 支持编译的 FFmpeg 库。
PyTorch / TorchAudio 支持 CUDA。
TorchAudio 的二进制发行版是基于 FFmpeg 4 库编译的,并包含硬件解码所需的逻辑。
在以下部分中,我们构建带有 NVDEC 支持的 FFmpeg 4 库,并通过 TorchAudio 的 StreamReader API 启用硬件加速。然后,我们比较使用 CPU 和 NVDEC 解码同一 MP4 视频所需的时间。
† 有关 NVDEC 和 FFmpeg 的详细信息,请参阅以下文章。
https://docs.nvidia.com/video-technologies/video-codec-sdk/nvdec-video-decoder-api-prog-guide/
https://docs.nvidia.com/video-technologies/video-codec-sdk/ffmpeg-with-nvidia-gpu/#compiling-ffmpeg
https://developer.nvidia.com/blog/nvidia-ffmpeg-transcoding-guide/
检查可用的 GPU¶
[1]:
!nvidia-smi
Thu Jun  2 04:14:27 2022
+-----------------------------------------------------------------------------+
| NVIDIA-SMI 460.32.03    Driver Version: 460.32.03    CUDA Version: 11.2     |
|-------------------------------+----------------------+----------------------+
| GPU  Name        Persistence-M| Bus-Id        Disp.A | Volatile Uncorr. ECC |
| Fan  Temp  Perf  Pwr:Usage/Cap|         Memory-Usage | GPU-Util  Compute M. |
|                               |                      |               MIG M. |
|===============================+======================+======================|
|   0  Tesla T4            Off  | 00000000:00:04.0 Off |                    0 |
| N/A   56C    P8     9W /  70W |      0MiB / 15109MiB |      0%      Default |
|                               |                      |                  N/A |
+-------------------------------+----------------------+----------------------+

+-----------------------------------------------------------------------------+
| Processes:                                                                  |
|  GPU   GI   CI        PID   Type   Process name                  GPU Memory |
|        ID   ID                                                   Usage      |
|=============================================================================|
|  No running processes found                                                 |
+-----------------------------------------------------------------------------+
使用每日构建版本更新 PyTorch 和 TorchAudio¶
在 TorchAudio 0.12 发布之前,我们需要使用 PyTorch 和 TorchAudio 的每日构建版本。
[2]:
!pip3 uninstall -y -q torchaudio torch
!pip3 install --progress-bar off --pre torch torchaudio --extra-index-url https://download.pytorch.org/whl/nightly/cu113 2> /dev/null
Looking in indexes: https://pypi.org/simple, https://us-python.pkg.dev/colab-wheels/public/simple/, https://download.pytorch.org/whl/nightly/cu113
Collecting torch
  Downloading https://download.pytorch.org/whl/nightly/cu113/torch-1.13.0.dev20220601%2Bcu113-cp37-cp37m-linux_x86_64.whl (2102.2 MB)

Collecting torchaudio
  Downloading https://download.pytorch.org/whl/nightly/cu113/torchaudio-0.12.0.dev20220601%2Bcu113-cp37-cp37m-linux_x86_64.whl (3.8 MB)

Requirement already satisfied: typing-extensions in /usr/local/lib/python3.7/dist-packages (from torch) (4.2.0)
Installing collected packages: torch, torchaudio
Successfully installed torch-1.13.0.dev20220601+cu113 torchaudio-0.12.0.dev20220601+cu113
构建带有 Nvidia NVDEC 支持的 FFmpeg 库¶
安装 NVIDIA 视频编解码器头文件¶
要使用 NVDEC 构建 FFmpeg,我们首先需要安装 FFmpeg 用于与 Video Codec SDK 交互的头文件。
[3]:
!git clone https://git.videolan.org/git/ffmpeg/nv-codec-headers.git
!cd nv-codec-headers && sudo make install
Cloning into 'nv-codec-headers'...
remote: Enumerating objects: 808, done.
remote: Counting objects: 100% (808/808), done.
remote: Compressing objects: 100% (688/688), done.
remote: Total 808 (delta 436), reused 0 (delta 0)
Receiving objects: 100% (808/808), 154.86 KiB | 396.00 KiB/s, done.
Resolving deltas: 100% (436/436), done.
sed 's#@@PREFIX@@#/usr/local#' ffnvcodec.pc.in > ffnvcodec.pc
install -m 0755 -d '/usr/local/include/ffnvcodec'
install -m 0644 include/ffnvcodec/*.h '/usr/local/include/ffnvcodec'
install -m 0755 -d '/usr/local/lib/pkgconfig'
install -m 0644 ffnvcodec.pc '/usr/local/lib/pkgconfig'
下载 FFmpeg 源代码¶
接下来,我们下载 FFmpeg 4 的源代码。任何高于 4.1 的版本均可使用。此处我们使用 4.4.2 版本。
[4]:
!wget -q https://github.com/FFmpeg/FFmpeg/archive/refs/tags/n4.4.2.tar.gz
!tar -xf n4.4.2.tar.gz
!mv FFmpeg-n4.4.2 ffmpeg
安装 FFmpeg 构建和运行时依赖项¶
在后续测试中,我们使用通过 HTTPS 协议传输的 H264 编码 MP4 视频,因此在此处安装相应的库。
[5]:
!apt -qq update
!apt -qq install -y yasm libx264-dev libgnutls28-dev
... Omitted for brevity ...

Setting up libx264-dev:amd64 (2:0.152.2854+gite9a5903-2) ...
Setting up yasm (1.3.0-2build1) ...
Setting up libunbound2:amd64 (1.6.7-1ubuntu2.4) ...
Setting up libp11-kit-dev:amd64 (0.23.9-2ubuntu0.1) ...
Setting up libtasn1-6-dev:amd64 (4.13-2) ...
Setting up libtasn1-doc (4.13-2) ...
Setting up libgnutlsxx28:amd64 (3.5.18-1ubuntu1.5) ...
Setting up libgnutls-dane0:amd64 (3.5.18-1ubuntu1.5) ...
Setting up libgnutls-openssl27:amd64 (3.5.18-1ubuntu1.5) ...
Setting up libgmpxx4ldbl:amd64 (2:6.1.2+dfsg-2) ...
Setting up libidn2-dev:amd64 (2.0.4-1.1ubuntu0.2) ...
Setting up libidn2-0-dev (2.0.4-1.1ubuntu0.2) ...
Setting up libgmp-dev:amd64 (2:6.1.2+dfsg-2) ...
Setting up nettle-dev:amd64 (3.4.1-0ubuntu0.18.04.1) ...
Setting up libgnutls28-dev:amd64 (3.5.18-1ubuntu1.5) ...
Processing triggers for man-db (2.8.3-2ubuntu0.1) ...
Processing triggers for libc-bin (2.27-3ubuntu1.3) ...
/sbin/ldconfig.real: /usr/local/lib/python3.7/dist-packages/ideep4py/lib/libmkldnn.so.0 is not a symbolic link
配置 FFmpeg 构建以支持 Nvidia CUDA 硬件¶
接下来我们配置 FFmpeg 的构建。请注意以下内容:
我们提供诸如
-I/usr/local/cuda/include,-L/usr/local/cuda/lib64和--enable-nvdec等标志以启用 NVDEC。有关详细信息,请参阅转码指南†。我们还提供了计算能力为 37 的 NVCC 标志。这是因为配置脚本默认会通过编译针对计算能力 30 的示例代码来验证 NVCC,而该版本对于 CUDA 11 来说过于陈旧。
为缩短编译时间,许多功能已被禁用。
我们在
/usr/lib/中安装该库,这是动态加载器的活动搜索路径之一。 这样做允许在不重启当前会话的情况下找到生成的库。这可能是一个不理想的位置,例如当用户未使用一次性虚拟机时。
† NVIDIA FFmpeg 转码指南 https://developer.nvidia.com/blog/nvidia-ffmpeg-transcoding-guide/
[6]:
# NOTE:
# When the configure script of FFmpeg 4 checks nvcc, it uses compute
# capability of 30 (3.0) by default. CUDA 11, however, does not support
# compute capability 30.
# Here, we use 37, which is supported by CUDA 11 and both K80 and T4.
#
# Tesla K80: 37
# NVIDIA T4: 75

%env ccap=37

# NOTE:
# We disable most of the features to speed up compilation
# The necessary components are
# - demuxer: mov
# - decoder: h264
# - gnutls (HTTPS)

!cd ffmpeg && ./configure \
  --prefix='/usr/' \
  --extra-cflags='-I/usr/local/cuda/include' \
  --extra-ldflags='-L/usr/local/cuda/lib64' \
  --nvccflags="-gencode arch=compute_${ccap},code=sm_${ccap} -O2" \
  --disable-doc \
  --disable-static \
  --disable-bsfs \
  --disable-decoders \
  --disable-encoders \
  --disable-filters \
  --disable-demuxers \
  --disable-devices \
  --disable-muxers \
  --disable-parsers \
  --disable-postproc \
  --disable-protocols \
  --enable-decoder=aac \
  --enable-decoder=h264 \
  --enable-decoder=h264_cuvid \
  --enable-demuxer=mov \
  --enable-filter=scale \
  --enable-protocol=file \
  --enable-protocol=https \
  --enable-gnutls \
  --enable-shared \
  --enable-gpl \
  --enable-nonfree \
  --enable-cuda-nvcc \
  --enable-libx264 \
  --enable-libnpp \
  --enable-nvenc \
  --enable-nvdec
env: ccap=37
install prefix            /usr/
source path               .
C compiler                gcc
C library                 glibc
ARCH                      x86 (generic)
big-endian                no
runtime cpu detection     yes
standalone assembly       yes
x86 assembler             yasm
MMX enabled               yes
MMXEXT enabled            yes
3DNow! enabled            yes
3DNow! extended enabled   yes
SSE enabled               yes
SSSE3 enabled             yes
AESNI enabled             yes
AVX enabled               yes
AVX2 enabled              yes
AVX-512 enabled           yes
XOP enabled               yes
FMA3 enabled              yes
FMA4 enabled              yes
i686 features enabled     yes
CMOV is fast              yes
EBX available             yes
EBP available             yes
debug symbols             yes
strip symbols             yes
optimize for size         no
optimizations             yes
static                    no
shared                    yes
postprocessing support    no
network support           yes
threading support         pthreads
safe bitstream reader     yes
texi2html enabled         no
perl enabled              yes
pod2man enabled           yes
makeinfo enabled          no
makeinfo supports HTML    no

External libraries:
alsa                    libx264                 lzma
bzlib                   libxcb                  zlib
gnutls                  libxcb_shape
iconv                   libxcb_xfixes

External libraries providing hardware acceleration:
cuda                    cuvid                   nvdec
cuda_llvm               ffnvcodec               nvenc
cuda_nvcc               libnpp                  v4l2_m2m

Libraries:
avcodec                 avformat                swscale
avdevice                avutil
avfilter                swresample

Programs:
ffmpeg                  ffprobe

Enabled decoders:
aac                     hevc                    vc1
av1                     mjpeg                   vp8
h263                    mpeg1video              vp9
h264                    mpeg2video
h264_cuvid              mpeg4

Enabled encoders:

Enabled hwaccels:
av1_nvdec               mpeg1_nvdec             vp8_nvdec
h264_nvdec              mpeg2_nvdec             vp9_nvdec
hevc_nvdec              mpeg4_nvdec             wmv3_nvdec
mjpeg_nvdec             vc1_nvdec

Enabled parsers:
h263                    mpeg4video              vp9

Enabled demuxers:
mov

Enabled muxers:

Enabled protocols:
file                    tcp
https                   tls

Enabled filters:
aformat                 hflip                   trim
anull                   null                    vflip
atrim                   scale
format                  transpose

Enabled bsfs:
h264_mp4toannexb        null                    vp9_superframe_split

Enabled indevs:

Enabled outdevs:

License: nonfree and unredistributable
构建并安装 FFmpeg¶
[7]:
!cd ffmpeg && make clean && make -j > /dev/null 2>&1
!cd ffmpeg && make install
INSTALL libavdevice/libavdevice.so
INSTALL libavfilter/libavfilter.so
INSTALL libavformat/libavformat.so
INSTALL libavcodec/libavcodec.so
INSTALL libswresample/libswresample.so
INSTALL libswscale/libswscale.so
INSTALL libavutil/libavutil.so
INSTALL install-progs-yes
INSTALL ffmpeg
INSTALL ffprobe
检查 FFmpeg 安装¶
让我们做一个快速检查,以确认我们构建的 FFmpeg 能够正常工作。
[8]:
!ffprobe -decoders
ffprobe version 4.4.2 Copyright (c) 2007-2021 the FFmpeg developers
  built with gcc 7 (Ubuntu 7.5.0-3ubuntu1~18.04)
  configuration: --prefix=/usr/ --extra-cflags=-I/usr/local/cuda/include --extra-ldflags=-L/usr/local/cuda/lib64 --nvccflags='-gencode arch=compute_37,code=sm_37 -O2' --disable-doc --disable-static --disable-bsfs --disable-decoders --disable-encoders --disable-filters --disable-demuxers --disable-devices --disable-muxers --disable-parsers --disable-postproc --disable-protocols --enable-decoder=aac --enable-decoder=h264 --enable-decoder=h264_cuvid --enable-demuxer=mov --enable-filter=scale --enable-protocol=file --enable-protocol=https --enable-gnutls --enable-shared --enable-gpl --enable-nonfree --enable-cuda-nvcc --enable-libx264 --enable-libnpp --enable-nvenc --enable-nvdec
  libavutil      56. 70.100 / 56. 70.100
  libavcodec     58.134.100 / 58.134.100
  libavformat    58. 76.100 / 58. 76.100
  libavdevice    58. 13.100 / 58. 13.100
  libavfilter     7.110.100 /  7.110.100
  libswscale      5.  9.100 /  5.  9.100
  libswresample   3.  9.100 /  3.  9.100
Decoders:
 V..... = Video
 A..... = Audio
 S..... = Subtitle
 .F.... = Frame-level multithreading
 ..S... = Slice-level multithreading
 ...X.. = Codec is experimental
 ....B. = Supports draw_horiz_band
 .....D = Supports direct rendering method 1
 ------
 V....D av1                  Alliance for Open Media AV1
 V...BD h263                 H.263 / H.263-1996, H.263+ / H.263-1998 / H.263 version 2
 VFS..D h264                 H.264 / AVC / MPEG-4 AVC / MPEG-4 part 10
 V..... h264_cuvid           Nvidia CUVID H264 decoder (codec h264)
 VFS..D hevc                 HEVC (High Efficiency Video Coding)
 V....D mjpeg                MJPEG (Motion JPEG)
 V.S.BD mpeg1video           MPEG-1 video
 V.S.BD mpeg2video           MPEG-2 video
 VF..BD mpeg4                MPEG-4 part 2
 V....D vc1                  SMPTE VC-1
 VFS..D vp8                  On2 VP8
 VFS..D vp9                  Google VP9
 A....D aac                  AAC (Advanced Audio Coding)
[9]:
!ffprobe -hide_banner "https://download.pytorch.org/torchaudio/tutorial-assets/stream-api/NASAs_Most_Scientifically_Complex_Space_Observatory_Requires_Precision-MP4_small.mp4"
Input #0, mov,mp4,m4a,3gp,3g2,mj2, from 'https://download.pytorch.org/torchaudio/tutorial-assets/stream-api/NASAs_Most_Scientifically_Complex_Space_Observatory_Requires_Precision-MP4_small.mp4':
  Metadata:
    major_brand     : mp42
    minor_version   : 512
    compatible_brands: mp42iso2avc1mp41
    encoder         : Lavf58.76.100
  Duration: 00:03:26.04, start: 0.000000, bitrate: 1294 kb/s
  Stream #0:0(eng): Video: h264 (High) (avc1 / 0x31637661), yuv420p(tv, bt709), 960x540 [SAR 1:1 DAR 16:9], 1156 kb/s, 29.97 fps, 29.97 tbr, 30k tbn, 59.94 tbc (default)
    Metadata:
      handler_name    : ?Mainconcept Video Media Handler
      vendor_id       : [0][0][0][0]
  Stream #0:1(eng): Audio: aac (LC) (mp4a / 0x6134706D), 48000 Hz, stereo, fltp, 128 kb/s (default)
    Metadata:
      handler_name    : #Mainconcept MP4 Sound Media Handler
      vendor_id       : [0][0][0][0]
使用 TorchAudio 对 NVDEC 进行基准测试¶
现在FFmpeg和生成的库已经准备好使用,我们测试NVDEC与TorchAudio。有关TorchAudio流式API的基本知识,请参阅流式API教程。
注意
如果您在导入 StreamReader 类后重新构建 FFmpeg,则需要重启会话以激活新构建的 FFmpeg 库。
[10]:
import torch
import torchaudio

print(torch.__version__)
print(torchaudio.__version__)

from torchaudio.io import StreamReader
1.13.0.dev20220601+cu113
0.12.0.dev20220601+cu113
[11]:
!pip3 install --progress-bar off boto3 2> /dev/null
Looking in indexes: https://pypi.org/simple, https://us-python.pkg.dev/colab-wheels/public/simple/
Collecting boto3
  Downloading boto3-1.24.1-py3-none-any.whl (132 kB)

Collecting botocore<1.28.0,>=1.27.1
  Downloading botocore-1.27.1-py3-none-any.whl (8.8 MB)

Collecting s3transfer<0.7.0,>=0.6.0
  Downloading s3transfer-0.6.0-py3-none-any.whl (79 kB)

Collecting jmespath<2.0.0,>=0.7.1
  Downloading jmespath-1.0.0-py3-none-any.whl (23 kB)
Requirement already satisfied: python-dateutil<3.0.0,>=2.1 in /usr/local/lib/python3.7/dist-packages (from botocore<1.28.0,>=1.27.1->boto3) (2.8.2)
Collecting urllib3<1.27,>=1.25.4
  Downloading urllib3-1.26.9-py2.py3-none-any.whl (138 kB)

Requirement already satisfied: six>=1.5 in /usr/local/lib/python3.7/dist-packages (from python-dateutil<3.0.0,>=2.1->botocore<1.28.0,>=1.27.1->boto3) (1.15.0)
Installing collected packages: urllib3, jmespath, botocore, s3transfer, boto3
  Attempting uninstall: urllib3
    Found existing installation: urllib3 1.24.3
    Uninstalling urllib3-1.24.3:
      Successfully uninstalled urllib3-1.24.3
Successfully installed boto3-1.24.1 botocore-1.27.1 jmespath-1.0.0 s3transfer-0.6.0 urllib3-1.26.9
[12]:
import time

import matplotlib.pyplot as plt
import pandas as pd
import boto3
from botocore import UNSIGNED
from botocore.config import Config

print(boto3.__version__)

pd.set_option('display.max_rows', None)
pd.set_option('display.max_columns', None)
1.24.1
[13]:
!wget -q -O input.mp4 "https://download.pytorch.org/torchaudio/tutorial-assets/stream-api/NASAs_Most_Scientifically_Complex_Space_Observatory_Requires_Precision-MP4_small.mp4"
首先,我们定义将用于测试的函数。
函数 test 从开始到结束解码给定的源,报告经过的时间,并返回一个图像帧作为示例。
[14]:
result = torch.zeros((4, 2))
samples = [[None, None] for _ in range(4)]


def test(src, config, i_sample):
  print("=" * 40)
  print("* Configuration:", config)
  print("* Source:", src)
  print("=" * 40)

  s = StreamReader(src)
  s.add_video_stream(5, **config)

  t0 = time.monotonic()
  num_frames = 0
  for i, (chunk, ) in enumerate(s.stream()):
    if i == 0:
      print(' - Chunk:', chunk.shape, chunk.device, chunk.dtype)
    if i == i_sample:
      sample = chunk[0]
    num_frames += chunk.shape[0]
  elapsed = time.monotonic() - t0

  print()
  print(f" - Processed {num_frames} frames.")
  print(f" - Elapsed: {elapsed} seconds.")
  print()

  return elapsed, sample
从本地文件解码 MP4¶
在首次测试中,我们比较了 CPU 与 NVDEC 解码 250MB MP4 视频所需的时间。
[15]:
local_src = "input.mp4"

cpu_conf = {
    "decoder": "h264",  # CPU decoding
}
cuda_conf = {
    "decoder": "h264_cuvid",  # Use CUDA HW decoder
    "hw_accel": "cuda:0",  # Then keep the memory on CUDA:0
}

i_sample = 520
CPU¶
[16]:
elapsed, sample = test(local_src, cpu_conf, i_sample)
========================================
* Configuration: {'decoder': 'h264'}
* Source: input.mp4
========================================
 - Chunk: torch.Size([5, 3, 540, 960]) cpu torch.uint8

 - Processed 6175 frames.
 - Elapsed: 45.752042501000005 seconds.
[17]:
result[0, 0] = elapsed
samples[0][0] = sample
CUDA¶
[18]:
elapsed, sample = test(local_src, cuda_conf, i_sample)
========================================
* Configuration: {'decoder': 'h264_cuvid', 'hw_accel': 'cuda:0'}
* Source: input.mp4
========================================
 - Chunk: torch.Size([5, 3, 540, 960]) cuda:0 torch.uint8

 - Processed 6175 frames.
 - Elapsed: 7.458571206999977 seconds.
[19]:
result[0, 1] = elapsed
samples[0][1] = sample
从网络解码 MP4¶
让我们在通过网络即时获取的源代码上运行相同的测试。
[20]:
network_src = "https://download.pytorch.org/torchaudio/tutorial-assets/stream-api/NASAs_Most_Scientifically_Complex_Space_Observatory_Requires_Precision-MP4_small.mp4"
i_sample = 750
CPU¶
[21]:
elapsed, sample = test(network_src, cpu_conf, i_sample)
========================================
* Configuration: {'decoder': 'h264'}
* Source: https://download.pytorch.org/torchaudio/tutorial-assets/stream-api/NASAs_Most_Scientifically_Complex_Space_Observatory_Requires_Precision-MP4_small.mp4
========================================
 - Chunk: torch.Size([5, 3, 540, 960]) cpu torch.uint8

 - Processed 6175 frames.
 - Elapsed: 40.36345302500001 seconds.
[22]:
result[1, 0] = elapsed
samples[1][0] = sample
CUDA¶
[23]:
elapsed, sample = test(network_src, cuda_conf, i_sample)
========================================
* Configuration: {'decoder': 'h264_cuvid', 'hw_accel': 'cuda:0'}
* Source: https://download.pytorch.org/torchaudio/tutorial-assets/stream-api/NASAs_Most_Scientifically_Complex_Space_Observatory_Requires_Precision-MP4_small.mp4
========================================
 - Chunk: torch.Size([5, 3, 540, 960]) cuda:0 torch.uint8

 - Processed 6175 frames.
 - Elapsed: 4.222158643999933 seconds.
[24]:
result[1, 1] = elapsed
samples[1][1] = sample
直接从 S3 解码 MP4¶
通过使用类文件对象输入,我们可以获取存储在 AWS S3 上的视频并进行解码,而无需将其保存到本地文件系统。
[25]:
bucket = "pytorch"
key = "torchaudio/tutorial-assets/stream-api/NASAs_Most_Scientifically_Complex_Space_Observatory_Requires_Precision-MP4_small.mp4"

s3_client = boto3.client("s3", config=Config(signature_version=UNSIGNED))
i_sample = 115
定义辅助类¶
StreamReader 支持具有 read 方法的类文件对象。此外,如果该类文件对象还具有 seek 方法,StreamReader 将尝试使用它以进行更可靠的媒体格式检测。
然而,boto3的S3客户端响应对象的seek方法仅抛出错误以告知用户不支持seek操作。因此,我们用一个不包含seek方法的类对其进行封装。这样,StreamReader就不会尝试使用seek方法。
注意
由于流式传输的特性,当使用没有 seek 方法的类文件对象时,某些格式不受支持。例如,MP4 格式的元数据位于文件的开头或结尾。如果元数据位于结尾,则在没有 seek 方法的情况下,StreamReader 无法解码流。
[26]:
# Wrapper to hide the native `seek` method of boto3, which
# only raises an error.
class UnseekableWrapper:
  def __init__(self, obj):
    self.obj = obj

  def read(self, n):
    return self.obj.read(n)

  def __str__(self):
    return str(self.obj)
CPU¶
[27]:
response = s3_client.get_object(Bucket=bucket, Key=key)
src = UnseekableWrapper(response["Body"])
elapsed, sample = test(src, cpu_conf, i_sample)
========================================
* Configuration: {'decoder': 'h264'}
* Source: <botocore.response.StreamingBody object at 0x7fecbfcb5c90>
========================================
 - Chunk: torch.Size([5, 3, 540, 960]) cpu torch.uint8

 - Processed 6175 frames.
 - Elapsed: 40.16508613600001 seconds.
[28]:
result[2, 0] = elapsed
samples[2][0] = sample
CUDA¶
[29]:
response = s3_client.get_object(Bucket=bucket, Key=key)
src = UnseekableWrapper(response["Body"])
elapsed, sample = test(src, cuda_conf, i_sample)
========================================
* Configuration: {'decoder': 'h264_cuvid', 'hw_accel': 'cuda:0'}
* Source: <botocore.response.StreamingBody object at 0x7fecbfc70390>
========================================
 - Chunk: torch.Size([5, 3, 540, 960]) cuda:0 torch.uint8

 - Processed 6175 frames.
 - Elapsed: 4.510979067999983 seconds.
[30]:
result[2, 1] = elapsed
samples[2][1] = sample
解码和缩放¶
在下一个测试中,我们添加了预处理。NVDEC 支持多种预处理方案,这些方案也在所选硬件上执行。对于 CPU,我们通过 FFmpeg 的过滤器图应用相同类型的软件预处理。
[31]:
cpu_conf = {
    "decoder": "h264",  # CPU decoding
    "filter_desc": "scale=360:240",  # Software filter
}
cuda_conf = {
    "decoder": "h264_cuvid",  # Use CUDA HW decoder
    "decoder_option": {
        "resize": "360x240",  # Then apply HW preprocessing (resize)
    },
    "hw_accel": "cuda:0",  # Then keep the memory on CUDA:0
}

i_sample = 1085
CPU¶
[32]:
elapsed, sample = test(local_src, cpu_conf, i_sample)
========================================
* Configuration: {'decoder': 'h264', 'filter_desc': 'scale=360:240'}
* Source: input.mp4
========================================
 - Chunk: torch.Size([5, 3, 240, 360]) cpu torch.uint8

 - Processed 6175 frames.
 - Elapsed: 18.506949264000013 seconds.
[33]:
result[3, 0] = elapsed
samples[3][0] = sample
CUDA¶
[34]:
elapsed, sample = test(local_src, cuda_conf, i_sample)
========================================
* Configuration: {'decoder': 'h264_cuvid', 'decoder_option': {'resize': '360x240'}, 'hw_accel': 'cuda:0'}
* Source: input.mp4
========================================
 - Chunk: torch.Size([5, 3, 240, 360]) cuda:0 torch.uint8

 - Processed 6175 frames.
 - Elapsed: 4.9442481019999605 seconds.
[35]:
result[3, 1] = elapsed
samples[3][1] = sample
结果¶
下表总结了使用 CPU 和 NVDEC 解码相同媒体所花费的时间。我们可以看到,使用 NVDEC 能带来显著的速度提升。
[36]:
res = pd.DataFrame(
    result.numpy(),
    index=["Decoding (local file)", "Decoding (network file)", "Decoding (file-like object, S3)", "Decoding + Resize"],
    columns=["CPU", "NVDEC"],
)
print(res)
                                       CPU     NVDEC
Decoding (local file)            45.752041  7.458571
Decoding (network file)          40.363453  4.222158
Decoding (file-like object, S3)  40.165085  4.510979
Decoding + Resize                18.506948  4.944248
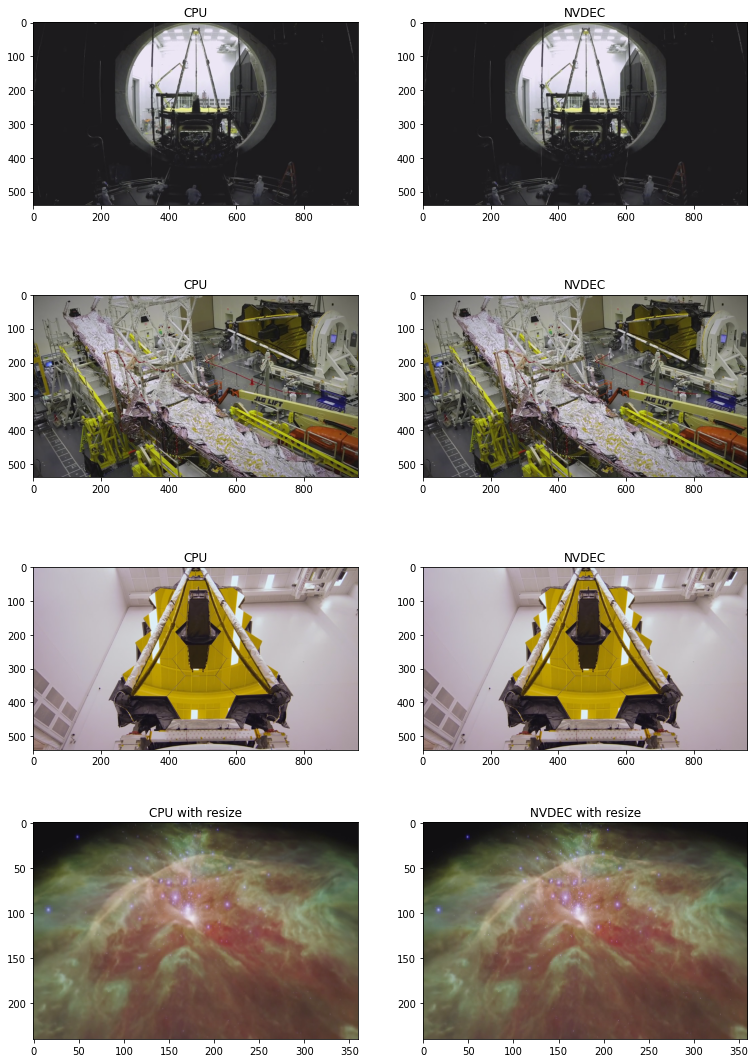
以下代码展示了由 CPU 解码和 NVDEC 生成的一些帧。它们产生的结果看似完全相同。
[37]:
def yuv_to_rgb(img):
  img = img.cpu().to(torch.float)
  y = img[..., 0, :, :]
  u = img[..., 1, :, :]
  v = img[..., 2, :, :]

  y /= 255
  u = u / 255 - 0.5
  v = v / 255 - 0.5

  r = y + 1.14 * v
  g = y + -0.396 * u - 0.581 * v
  b = y + 2.029 * u

  rgb = torch.stack([r, g, b], -1)
  rgb = (rgb * 255).clamp(0, 255).to(torch.uint8)
  return rgb.numpy()
[38]:
f, axs = plt.subplots(4, 2, figsize=[12.8, 19.2])
for i in range(4):
  for j in range(2):
    axs[i][j].imshow(yuv_to_rgb(samples[i][j]))
    axs[i][j].set_title(
        f"{'CPU' if j == 0 else 'NVDEC'}{' with resize' if i == 3 else ''}")
plt.plot(block=False)
[38]:
[]
结论¶
我们探讨了如何构建支持 NVDEC 的 FFmpeg 库,并在 TorchAudio 中使用它。NVDEC 提供了显著的速度提升。